Gilded Autumn DSP: do the punches match the images?
Get link
Facebook
X
Pinterest
Email
Other Apps
-
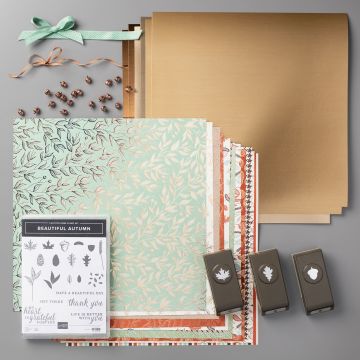
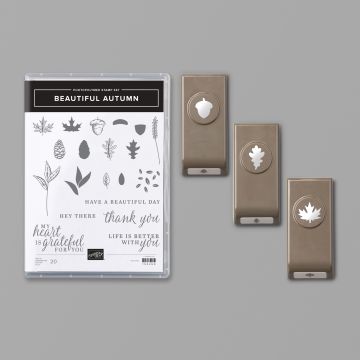
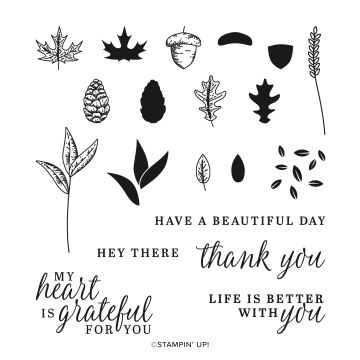
I was working on some of my Baker Boxes for the upcoming craft fair. When it came to one "flavor" I couldn't decide on the embellishments for the tag. I had already made the tags from the Brushed Metallic cardstock that is part of the Gilded Autumn Suite. When I looked at the suite again I thought that the punches with an acorn, maple and oak leaves would be great. My initial idea was to punch them also from metallic paper. So I ordered the pack of punches.
When they arrived in the mail they were a little larger than I expected. Then a light bulb went on and I wondered if the punches would match up with the images on two of the different pattern papers in the suite. I had to wait overnight to try because I was working on sleep deprivation.
So this morning I meandered into my craft room, brought out the DSP and cut out a small section. I didn't want to cut too large a piece in case my idea didn't work. Was I thrilled to find out that they matched up! I think they work perfectly on the tags. I fussy cut the small leaves on the label. The acorn trinkets really pull it all together with the gold cord from the Wonder of the Season ribbon combo!
I demonstrate in this video as well and also share a couple other tips with the stamps and punches.
These are the Baker's boxes that I used the punched images to embellish.
Here's a list of the products that I mention in the video, which can be purchased by clicking here:
Hi friends, It's been a while since I posted. The last of March and April, so far, have been eventful. I had a dear uncle and cousin, both passed away on the same day. They were uncle and nephew to each other. My favorite uncle, on my mom's side, was 97 when he pass. My cousin, was 87. I am close with one of his daughters. Ironically last year at my dad's funeral I handed her a card for her birthday at my dad's funeral. This year, at her dad's funeral, she hand delivered one to me. My birthday rested between both of their funerals. So I was gone for a week for the funerals and visitations. After I got back it took me a week to recoup, due to my chronic fatigue. Well, I rested up enough to attend Stampin' Ups Onstage Local in Minneapolis! What a blast! (I'm still recouping) Lots of fun new products to play with and got the NEW 2017-2018 catalog . I was able to place my Pre-Preorder! Demonstra...
April has always been a busy birthday month for me. About 2 or 3 cards a week about 12 in total. This month would have also been my mother's 95th birthday, we lost her a year and a half ago. In addition, I have also been sending out cards for sympathy, 5 so far this month, all not related to the pandemic. A friend lost her father, a cousin died of cancer so cards for his two brothers and wife and a former coworker his son. I've also sent out Thinking of You cards to people who are alone and shut in and a Get Well card to a friend from church who fell and injured herself. I also just remembered I need to make a card for my grandson, marking the 1st anniversary of his baptism. The other day I was looking for card ideas and clicked on this link, not even sure how I got there. :-) But it was for a fun fold she called a Side Panel card. It was in a 5" x 7" format. Since all of my cards, typically are of the A2 size 4-1/4" x 5-1/2. I de...
For the last 15 years I have been making these Mini CD Jewel case calendars. These are the designs for this year. For me coming up with designs are the most difficult part. Sometimes ideas come to me in the middle of the night and everything goes smoothly, then sometimes it takes me forever to come up with a design. This year I had the December design in my head before I even started January. For the first time I kept track of the amount of time and the supply costs. I always knew that if I charged my customers the labor involved no on would want to purchase my calendars, even if I used minimum wage as the labor cost. Just the coloring along for October took me 8 hours. Uffda!!! I'd love to hear which are your favorites. I also have m...


Comments
Post a Comment