Tuesday, June 23, 2020

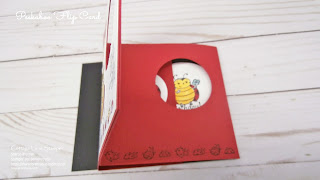
Peekaboo Flip Card: Little Ladybug

I wanted to make a fun card for my World Vision child from Guatemala, Darlin.  Since I have only grandsons I don't have a lot of little girl stamps.  This retired Little Ladybug stamp set from the 2020 Sale-a-bration is so cute I thought it would be perfect for her and also for a friend of mine, who loves lady bugs and is going through a difficult time right now. So I made two.

I also saw a Peekaboo card on Pinterest the other day and thought the two would work so well together! This is the card for my friend.

The supplies and dimensions are:
Card Front: 4-1/4" x 8-1/4", scored at 5-1/2"
Card Back: 4-1/4" x 5-3/4", scored at 5-1/2"
Card Inside: 4-1/4" x 8-1/2, scored at 4-1/4"
Front Panel: 4" x 5-1/4"

Video of card technique:

Different views of the mechanism:


Inside circle on card back: 2nd largest die from Layer Circle dies
Inside mechanism circle: punched from front Whisper White panel

 
Layer Circles dies
#151770
 
2" circle punch
#133782
 
Memento Black
#132708
 
Balmy Blue Combo Stampin' Blends
#148544
 
Granny Apple Green Combo
Stampin' Blends
#147274
 
Mango Melody Combo
Stampin' Blends
#154888
 
Crumb Cake Combo
Stampin' Blends
#154882
 
Smokey Slate Combo
Stampin' Blends
#145058
 
Real Red Combo
Stampin' Blends
#154899

Basic Black cardstock
#121045

Whisper White cardstock
#100730

Real Red cardstock
#102482


Images: Stampin' Up!©

World of Good: Old World Letter

I love the look of the"Beautiful World" stamp set and World Map dies.  From what I've seen on Pinterest people are using the globe and stand stamps and dies.  I wanted to try something with, maybe, the lesser used dies. 

There is one that just embosses the look of script that embosses instead of cutting.


I think I have some parchment paper somewhere but wasn't sure where I put it to keep it safe.  So I took a piece of copy paper and the die that looks like script.  I tapped the die in my Sahara Sand ink pad the put it on my copy paper and ran it through my die cutting & embossing machine so the script was inked up. Starting at the top I did this all the way down the little 2" x 2-3/4" sheet.

Then I sponged it a little and used an old retired Distressing Tool.  This is what it looks like, if you have one laying around and don't know what it's for.


Stampin' Distress Tool - Stampin' Up! | Stampin up, Stampin, Paper ...
I ran it around the "letter" creating a little ragged edge.  Then I lightly sponged the paper to make it look weathered. 

I added a couple more stamps and dies, the feather stamped in Basic Gray, the ink well, the compass and a ship from "Sailing Away" stamp set and the coordinating "Smooth Sailing" dies. 

The sentiment is punched with the new Lovely Layers Pick a Punchpunch, stamped in Early Espresso.

The background layer is the "Old World Paper" embossing folder from the World of Good Suite in one of the new In Colors - Cinnamon Cider. 


Thursday, June 18, 2020

Tutorial: Gift Box for Bath & Body© pocket hand sanitzers

Looking for a quick and easy gift?  I've sold the pocket size Bath & Body hand sanitizers in the past a craft fairs.  This year, I thought I would try a different type box.  You could step this up a notch and put it in a cello bag with a bit of ribbon.

This one is super simple to make, takes only a small piece of cardstock, some DSP and whatever you want to use to embellish it.

The box base is 4-3/4" x 3-3/4".  It is scored on 3 sides.  On the long sides, score one inch from each edge.  One the bottom score 1" and 2" from the bottom and the on each side mark at the 3" point.

At an angle from the 3" pencil mark to the top at the score line, cut to make the angle part of the box.

Watch this video:
Supplies:
Cardstock: 4-3/4" x 3-3/4"
DSP: 1-5/8" x 2-5/8" and 3/4" x 6" (gently score at 1", 2", 3-3/4" and 4-3/4")
I used a 2" circle punch for the Whisper White and the Starburst punch for the background layer. 
Whatever else you want to use to embellish it.


Love to see your gift boxes.  Share them on my Facebook Group Page: Cottage Lane Stamper & Friends

Monday, June 15, 2020

Peony Garden Suite: 3D Flower assembly

As soon as I saw the Peony Garden Suite Collection in the catalog I new I would be ordering it.  When I lived in New Ulm I had a beautiful row of deep pink peonies that bordered the edge of my yard and driveway.  Every time I drove into my driveway I would stop to admire them  It saddens me to say that the people that bought my house didn't have the same affection for them as I did.  They removed them. 😞

I CASE'd this card from Rachel Tessman, another Minnesota demonstrator, who's very talented. Mine is a little different. This one is Purple Posy cardstock and sponged with Highland Heather.

I made 4 different cards.  The first two I did ahead of time with the Petal Pink on Petal Pink and the Flirty Flamingo on Whisper White.

The Whisper White background layer is embossed with the Subtle 3D embossing folder as is the banner on which the sentiment is stamped.
I inadvertently forgot to order the coordinating 3D embossing folder, Dainty Diamonds so I substituted the Peony Garden DSP.  This card is Whisper White cardstock sponged with Flirty Flamingo.
I did something a little different with this one, by adding a layer of vellum that I embossed with the Subtles 3D embossing folder. Underneath is a layer of Petal Pink cardstock. The flower parts are also Petal Pink and sponged with Petal Pink.
This is a closeup of the Whisper White and Flirty Flamingo.  I love the subtly of the sponging!

I did a video while making the third card with the Purple Posy and Highland Heather. When I went to download the file it was corrupted!!! So I re-did the video with this flower.


The flower is die cut in Whisper White and is sponged with Petal Pink. The pistel (the middle part of the flower) is die cut in Whisper White and the ends are sponged with So Saffron. I forgot to put the Elegant Fauceted Gems on this last card. OOPS!

I used scraps of Pear Pizzazz for the leaves and Old Olive for the leaf edgings.

The sentiments are from Peaceful Moments stamp set.

See how the Peony is assembled in this video.  It's not as intimidating as it might appear.


DIMENSIONS:
Whisper White: Card Base 8-1/2 x 5-1/2" and for flowers 4" x 5-1/4"
Colored Card layer 3-7/8 x 5-1/8"
Peony Garden DSP 2-1/2" x 3-7/8"
Banner - Gray Granite 2" x 4-1/2"
Scraps of Pear Pizzaz for leaves and Old Olive for leaf edges

SUPPLIES:
 
Peony Garden Suite Collection
#154129
 
Prize Peony Bundle
#154056
 
Prize Peony Stamp Set
#152504
 
Peony dies
#152701
 
Peaceful Moments stamp set
#151595
 
Peony Garden DSP
#152483
Old Olive cardstock
#100702

Pear Pizzaz cardstock
#131201
Highland Heather Cardstock
#146986

Purple Posy cardstock
#150881

Petal Pink cardstock
#146985

Gray Granite cardstock
#146983


Whisper White cardstock
#100730


Vellum
#101856
Petal Pink
#147108

Highland Heather
#147103

Old Olive
#147090

Flirty Flamingo
#147052
So Saffron
#147109
 
Tuxedo Black
#132708
Subtles 3D Embossing Folder
#151775
Thank you for stopping by!  Love to hear your comments!
Sharon

Tips on Organizing new stamp sets & dies/bundles and using Pinterest

 Not being organized makes me go in a tizzy!  I like to be able to put my hands on a stamp set when I'm creating a card.  Looking for a ...