Saturday, December 30, 2023

Painted Wishes New Kits Collection Addition!

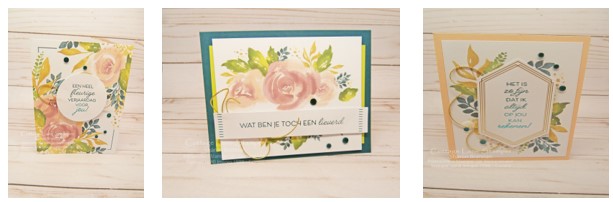
 Check out this new addition to the Kits Collection!  These are only available online. This kit is stamp free!  No inky fingers.  😊 It also includes sentiments in English, French, German & DUTCH!  

This kit has three designs with three cards of each design.  Join me as I put three of the cards together. 

My sentiments are in Dutch for my Dutch cousins.  Card one on the left says "Wishing the happiest birthday to you!"  Card two in the middle says: "Thank you for your kindness" and card three on the right says: "I feel blessed to have a wonderful, kind and amazing friend  like you!"


You can purchase this is as well as others at my online store: SHOP HERE

Thank you for stopping by.  Make sure to like, comment, share & subscribe!


Images: Stampin' Up!© 1990 - Current

Tuesday, December 26, 2023

Mini Gift bag with Mini Desk Calendar

Christmas is over but not for me.  I won't be celebrating Christmas with my family until after the 1st of the year.  This year I'm giving my daughter, her husband and their three sons along with my son a pillow covered with one of my dad's flannel shirts that I saved after he passed away.  I have a cousin who is a treasure and great quilt maker.  She did the same thing with her dad's shirts so she offered to turn my dad's flannel shirts into pillows for me. 

Many years ago my dad had a heart attach when he was in his 50's and to help him to stop smoking he always had Chiclets in his shirt pocket.  The grand kids would always hop on his lap and help themselves to one.  They no longer make Chiclets in a box with 10 pieces of gum, but I was able to find mini Chicklets in a small package. So each shirt has a package of Chicklets as well as a laminated photo of my parents' last Christmas together.  I didn't know when I took that photo that it would be their last Christmas.  He passed away about 30 days later. 

Also in the gift bag with the pillow, for my son, daughter & son-in-law I included a calendar. My daughter has one of the mini-cd calendars that I make. (I'll post a photo below) and I made another type of calendar in a regular CD case for my son & son-in-law. (see photos below)

I also made a gift bag for their calendars. (find a YouTube link below for this gift bag) . Last night I decided to make a desk calendar for each of my grandsons that holds Post-It notes and a mini pen (the mini pens haven't arrived yet, I found them on Amazon). They are homeschooled and I thought this might be a handy thing to have on their desks. 

Here are photos of the calendars and the gift bags.  The gift bags are made with 2 sheets of 6" x 6". retired DSP (a great way to use retired DSP). You can used a l2 x 12 piece of cardstock to make the calendar/Post It note holder and the bag and still have some left over.  Below are instructions for both the calendar and a video tutorial for the gift bag.  

Desk Calendar with Post-It© notes and mini pen

Card stock:

Easel base 
3-3/4" x 10-1/2", scored on long side at 4", 8", 9" & 10"

Post-It Note Holder: 
4-3/4" x 7: score on long side at 4" & 4-1/2", score on short side at 1/2" and 4-1/4". On the larger score part, 1-1/2" from top score up to the perpendicular score line, on both sides ( this is in the 1/2" section)

DSP: 
3-1/2" x 3" & 3-1/2 x 2-1/4"

Easel base: Burnish score lines, fold largest section down and using a corner rounder, round the top corners. Starting at the 1/2" flap fold in zigzag fashion, with valley, mountain, valley, mountain.  On the 1/2" flap attach adhesive then fold the top down and seal.

Post-It Note Pocket:

Post-It Note Holder: 
Card stock: 4-3/4" x 7: score on long side at 4" & 4-1/2", score on short side at 1/2" and 4-1/4". On the larger score part, 1-1/2" from top score up to the perpendicular score line, on both sides ( this is in the 1/2" section)

This little part that is 1-1/2" from the top and 1/2" in from the side, trim this piece out.

Snip the little square up to the score line.

Using your corner round, round the corners of the top of the pocket. 
Next we will adhere the DSP.  Take the 3-1/2" x 3" and round the corners on long side.
Adhere this piece to the pocket on the larger half, where you have just rounded the corners. 

Put adhesive on the bottom flaps on both sides. Use a strong adhesive like Tear & Tape, Multipurpose Glue or Stampin' Seal +©


Attach the bottom flaps to the top flaps, tucking in the little tiny flaps in first.

Next, apply the other piece of DSP to the front of the pocket. 

Attach the calendar to the front of the pocket with a strong adhesive. 


Next we will attached this pocket to the easel base, using a strong adhesive.
And you are done!!!! Add your Post-It notes and pens. (my pens haven't arrived yet, but I found these on Amazon. I'm going to take off the little key chain.  There are other options with larger quantities, but I only need three.  


Here is how I made the gift bag.  I CASE'd this from Karen Titus' Facebook Page "Stampin' On The Back Porch.


Mini CD Case Calendar 


Gift Bag with Larger CD Case Calendar


My dad's pillows with the Chicklet's gum and photo:


Let me know which you like better; the video tutorial or the photos of the process.  

Make sure to like, share & subscribe to continue to receive my posts. 


Images: Stampin' Up!© 1990 - Current


Tips on Organizing new stamp sets & dies/bundles and using Pinterest

 Not being organized makes me go in a tizzy!  I like to be able to put my hands on a stamp set when I'm creating a card.  Looking for a ...