Wednesday, November 23, 2016

Star of Light - Elegant in Night of Navy

Hi Stampers,

It's been a while since I've posted.  I was busy tying up some loose ends last week before the craft fair that I participated in last weekend.  It went pretty well. It was the first time I participated at this venue.  I have another one coming up first weekend in December, so need to replenish some things in the next week. 

I want to share with you one of the cards we made in stamp class last week.  This is from one of my favorite bundles from the Holiday catalog, Starlight and Star of Light. 


This is such an elegant set.  The card is very simple.  It's only the card layer and the two star layers.  Using the Simple Scored we scored the card base 1/4" and 5/8" of an inch from the left edge  and then the 4" and 4-1/4" from the right edge (short side) then turned it to the long edge, scored it at 1/4" and 5/8" on the left side and then 5-1/4" and 5-3/8" on the right side (long side).

The sentiments are stamped in Night of Navy. 

The stars are die cut on 3-1/2" x 3-1/4" piece of card stock, one is Whisper White and the other is Night of Navy.  The white is adhered to the Navy piece and then both are attached to the card base with some Dimensionals.  Easy Peasy!

Make sure you check out our Online Extravaganza going on until Nov 28! 

Supplies:


Star of Light Bundle
#143508
 
Night of Navy Cardstock
#100867
 
Whisper White Cardstock
#110730
 
Night of Navy
#126970
 
Simply Scored
#122334
 
Stampin' Pierce Mat
#126199
 
Big Shot
#143623
 
Fine Tip Glue Pen
#138309
 
Dimensionals
#104430
 

Thank you for stopping by!  Have a Happy Thanksgiving!

Saturday, November 19, 2016

November Paper Pumpkin - "Wonderful Winterland"

Hi stampers!

This month's Paper Pumpkin arrived all dressed up for the holidays, traditionally it's in it's Pumpkin colored box, this month it's in beautiful holiday blue!


Stampin' Up! Images ©

I'm so excited to share with you the November Paper Pumpkin.  Join me as I open the box and share the contents with you.  Then watch as I put together the beautiful note cards!


You can still order yours if you hurry,  I have a feeling that these won't last long! 

They will appear in the store in a few days to order separately. Store Or, give yourself a gift  and register for Paper Pumpkin.  It's like getting a present in the mail box every month!

A caveat, I missed one tiny step when putting these together, I really need to read directions!  I mention in the video Soft Sky and wondered where it was.  Well, there is another layer between the trees (top layer) and the blue houses (bottom layer) I am posting the two photos side by side so you can see where I messed up.  Sorry about that! 


Friday, November 18, 2016

Online Extravaganza! Great time get some great deals and do some Christmas Shopping!

Online Extravaganza only happens once a year so be sure to make the most of it.
 

For one week only, November 21-28, you can save up to 40% on select products. To sweeten the deals, we will be having 24-hour sales on the first and last day of the promotion, featuring special products available for that day only.

You can even get a sneak peek AND save on products that will be on the future holiday catalog retiring list. You won’t want anyone to miss out on this great opportunity to stock up and save!

Some supplies are limited so don't wait!


Here's a list of the items going on sale!

 
24 hour sale NOVEMBER 28 ONLY


10% OFF November 21 - 28

 
20 % off November 21 - 28


30% off November 21 - 28


40% off Nov 21 - 28


Make your list and start shopping!  Don't miss out on this great sale! Some supplies are limited so don't wait!


Click here to start shopping

Wednesday, November 16, 2016

Stitched Shapes - Limited time availability


The Stitched Shapes Framelits that debuted Nov. 1, are only be available to order until Nov 21.  Then they won't reappear until the new Annual Catalog comes out in 2017.

 
So if these captured your eye, don't delay, order today!

Here's a link for your convenience:

https://www.stampinup.com/ecweb/searchresults.aspx


For a little inspiration, here is a card made with the Merry Mice stamp sets that pair with the Stitched Shapes Framelits.Notice the little "stitched" border around the Very Vanilla die cuts?  It is on sale through the end of November, 25% off. 


Supplies can be purchased at: https://www.stampinup.com/ecweb/itemlist.aspx?categoryid=10300&utm_source=olo&utm_medium=main-ad&utm_campaign=new-olo-homepage

Monday, November 14, 2016

Watercolor - Vintage Leaves

Yesterday I saw a posting by one of my fellow demonstrators of the Vintage Leaves stamp set, done on watercolor paper.  When I expressed how much I loved it she replied she wanted to see mine. She did hers in Cherry Cobbler. So thought I'd better give it a whirl before I got distracted and forgot about it.  (Seems to happen a lot since I became a "senior citizen". 


I stamped the leaves, in Cajun Craze on watercolor paper and then with my Aqua Painter, brushed the each leaf, taking care not to get my brush too wet.  The middle one I stamped off once, the other two are stamped full strength. The one in the upper left hand corner I stamped in Tangelo Twist (retired).  The sentiment is from Butterfly Basics and stamped in Soft Suede.  the background layer is Early Espresso, and the base is Whisper White

I love the Stampin' Up! Aqua Painters and I don't say that lightly, I recommend something only when I believe in it. 

These Aqua Painters distribute a constant and even flow of water.  I had another brand that I bought before becoming a demonstrator, I would have to squeeze the barrel to keep the water flowing and the color of the ink would flow up into the barrel and I would have to empty the barrel frequently if I didn't want to mix the colors.  The Aqua Painter does not seem to have this issue.  When I'm done with one color I just have to run the brush across my scrap paper until the brush is clean. 

Hope you will leave a comment or two, they mean a lot. 

Any of these products can be purchased in my store, just click on the link of the product you like. 

Take care and God bless!

Saturday, November 12, 2016

Here Comes Santa's Sleigh

I ordered Santa's Sleigh last week and got it this past Tuesday.  May I say that I love this set!  The ideas have been flowing.  I've made 4 cards in the last two days.  Three are the same design but in different colors and papers. 

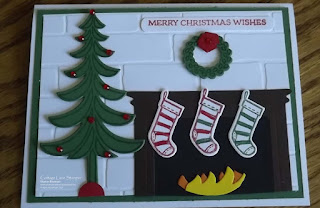
As soon as I saw this set I got this idea and couldn't wait to see how it turned out. I've always loved fireplaces.  Something so comforting, thinking about curling up in front of a fire, with the stockings all hung, on a cold Minnesota winter's night with a good book, glass of wine or hot chocolate and a snow globe kind of snow falling outside. 


I used the Brick Wall embossing folder, the Hearth and Home Thinlit.  I out the panes from the window and glued it in place cut off the bottom part. The window box was used as the fireplace mantel. The flame is actually some of the tree die cut in yellow and orange scraps then glued together and trimmed.  The tree stand is 1/2' circle punch with part of the bottom cut off.  The rest is all from the Santa's Sleigh stamp set and Santa's Sleigh Thinlits Dies.  The rhinestones are from some old embellishments that I had hanging around. 

I really LOVE how this turned out! 

This was the first card I made, where the sleigh is in Real Red.  I used the star from Star of Night Thinlits.  The background sleigh is Gold foil and the tree is in my favorite, but sadly retired, Mossy Meadow.  (Sad face here).  I used Shimmer paper, torn, with Two Way glue (also retired) and the Softly Falling embossing folder for the background. 


Then I wanted to see how the sleigh would look in Cherry Cobbler.  I think I like it better, it gives it such a rich color.  The presents are wrapped in Baker's Twine and adhered on the back with Snail.


After doing those two I wanted to see how the sleigh would look in all gold.  Totally love this one! The wreath and reindeer are also in the stamp set and Framelit die cut set.  I had an old border punch that I used for the stars so I punched some out and attached them with glue dots.  Again I used the Shimmer paper and Softly Falling embossing folder.


If you love any of these ideas and would like to make them you can purchase any of the products I used, just click on the links. 

I appreciate your comments, they mean a lot. 

If you don't have a demonstrator I would love to be yours!  That's the great thing about the internet, we don't even have to live in the same city or state for that matter!  And hopefully also become friends!

God bless you!

Friday, November 11, 2016

October Card Stamping Class - Leaves, Pumpkins,and Swirly Scribbles

 
Every month I go to my up-line's house for stamp class.  It's nice to have someone cut everything out for me, just like I do for my classes.  Kind of like having someone else cooking for you!

We usually make 4 different designs, but a few more cards.  Some people can't make it to her Monday class, we go Thursdays, there is two of us plus my up-line, so we also make the cards for those that don't make it on Monday.   

These are the cards we made last month:


Vintage Leaves

This is my favorite card.  I love the deep, rich colors in this card, Cajun Craze, Crushed Curry, Old Olive and Pumpkin Pie I believe. Our demonstrator did the sponging on our leaves ahead of time. They were then cut with Leaflets Framelits.  We did the background stamping in Early Espresso.
 

Vintage Leaves
 
 
Leaflet Thinlits
 

This next card is made with the Swirly Scribbles Thinlits.  I don't have this set but may have to get it.  I've seen so many beautiful ideas and different cards made with this set.  Love the pumpkins.  They are a little hard to glue on, but if you go to my video from yesterday, it would be a great method to use on this die cut.  Here's the link:  How to adhere intricate die cuts.
 
 
Swirly Scribbles
 

This third set is made with the Places You'll go.  This would be a stamp set for a graduation card, some one entering the military or just and little bit of encouragement card and who couldn't use that!  This card is for someone special in your life who make's your world a little nicer.  You can pair this with the Layering Circles Thinlits to cut out the globe.


Layering Circles


I bought all three of the Layering die cut sets, Circles, Squares and Ovals a month ago and I can't tell you how many times that I have used them already.  Then Stampin' Up! came out with Stitched Shapes November 1st of this year that coordinates with all the Layering die cut sets!  Holy cow!  This set is another must to have in your collection of die cuts.  So may possibilities.  I going to love, love, love using all four of these together. 
 

This last card also uses the Swirly Scribbles Thinlits and the notes are made with the small oval punch.  Even when the  punches are retired I hang on them because it always seems that some new card set comes out that you can use them with. 

I love the simplicity of this card, it's a great card to have on hand when you want to send something to someone that you are thinking about.  Wouldn't you love to get this in the mail?  I would.  Texting is ok for some things but there is nothing that can replace getting a card in the mail with a personal, handwritten note, especially on a handmade card.  You know that someone has taken a lot of effort to send you some special. 

I hope you enjoyed these.  If you want instructions or have any questions, please send me a note or comment below.  Your comments mean a lot to me, it encourages me to keep going. 

All the stamp sets and supplies to make them are available in my store.  Just click on the links above.  Thanks for stopping by!


Thursday, November 10, 2016

Tip: Adhering Intricate Dies

Hi everyone,

Today I wanted to share with you a tip that I found on Pinterest by Lisa Curcio on how to adhere those very beautiful, intricate dies.  This works so slick and much easier and less messy than using glue or Snail and getting it in the open spaces on your die cut item and looking so tacky. 

I'll demonstrate this using the gorgeous Santa's Sleigh bundle by Stampin' Up!.  I absolutely love this set and all the little pieces that are included in the stamp set and the Framelit dies.  You can use it with so many other of our stamp sets.  The idea possibilities are endless for making your cards.  I also used the small star from the Starlight Framelit Die Cuts.

I wonder if I will go through Christmas card making withdrawal after the Christmas season is over?

Here's the little video I created for you. 


Supplies:

Whisper White cardstock
  • (1) 5.5" x 8.5", scored at 4.25"
  • (1) 4" x 5.25", embossed with the Softly Falling Textured Embossing folder
Shimmer Paper
  • 4" x 2" torn on the top edge, adding glue to the torn edge and sprinkled with white glitter or Dazzling Diamonds
Gold Foil
  • 2.5" x 4.5"
  • scrap for the star and one bow
Cherry Cobbler cardstock
  • 3" x 2" and scrap for 2 bows
Mossy Meadow cardstock (retired)
  • 3" x 4", stamped with Mossy Meadow ink retired) and die cut
This Christmas Specialty DSP
  • Scraps used for gifts in sleigh

Sharon's 24/7 online Stampin' Up! store


Santa's Sleigh Bundle
#143499


Santa's Sleigh stamp set
#14207


Santa's Sleigh Die Set
#140278


Starlight Thinlits
#141840


Softly Falling Texture Impressions Embossing Folder
#139672
 
 
Cherry Cobbler cardstock
#119685


Whisper White cardstock
#110730


Shimmer Paper
#101910


Gold Foil
#132622
 

This Christmas Specialty DSP
#141628


Tear N Tape
#138995


Mini Glue Dots
#103683
 
 
Snail
#104332


Dazzling Diamonds Glitter
#133751


Tombow Multipurpose Glue
#110755


Magnetic Platform
#130658


Big Shot
#113439


Big Shot Die Brush
#140603


Paper Piercer
#126189

 ]

  
Stampin' Pierce Mat
#126199

 
Images © Stampin' Up!


I hope you enjoyed this! 

If you do not have a Stampin' Up! demonstrator I would be honored to be yours. 


Tips on Organizing new stamp sets & dies/bundles and using Pinterest

 Not being organized makes me go in a tizzy!  I like to be able to put my hands on a stamp set when I'm creating a card.  Looking for a ...