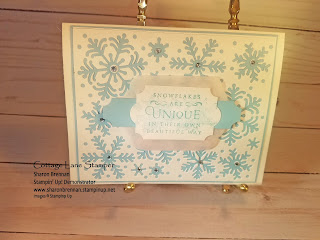
Holiday Preview: "Beautiful Blizzard", so many options!
If you know me, you know I don't sleep well. So this morning in the wee hours, I got up and started to putter around in my craft room, putting way my new things from the Holiday catalog.
I got to the Beautiful Blizzard bundle I got some ideas that I just had to try out with the Blizzard Thinlet! Let me show you!
Alternative ways to use the die:
Looking at these two cards you can see that I used the positive and negative images.
Card 1: On a 4 x 5 piece of card stock, which is the size of the Thinlet, I adhered a piece of our Adhesive Sheet to the whole piece of Shimmer cardstock. Then I ran it through the Big Shot. I ran it through a couple time. It was early so my brain was still in a bit of a fog. It wouldn't cut through the backing of the Adhesive sheet. Then the light bulb came on! Duh! the adhesive was on the snowflakes, I didn't need to punch them out. So I peeled them off and place them on the Balmy Blue cardstock in about the same place that they are on the die. That card is on the left. I even used the little tiny dots that were left behind. (Note to self, buy that new "Take Your Pick Tool", pg 30 in the Holiday Catalog!)
Card 2: I peeled off the Adhesive backing off the remaining negative
sheet of Shimmer cardstock and placed in another piece of Balmy Blue. Some of the snowflakes don't have centers so I placed rhinestones in the center of each snowflake. Great way to get two cards out of one piece of cardstock. I love saving paper, don't you!
Card 3: I used the Blizzard Thinlet as an embossing die with the Embossing Mat (a new item in the annual catalog page 221, expanding your use of your Thinlits and Framelits) and a piece of silver foil. Don't you just love the beautiful embossed image! I used a little retired ribbon and black for the card base.
Card 4: On a piece of Night of Navy, I used the Blizzard die and some of our White Shimmer Embossing Paste. Smooth the embossing paste across the back with a pallet knife. Gently lift the die off of the paper after applying the embossing paste and let it sit for 5-10 minutes to dry.
And to think I bought this set because of all the beautiful snowflakes and it would cut bunches all at once!
I can't show you an image from the catalog until September 5, but I did take my own photos so I could upload it into my Evernote. These photos don't really do justice to the set.
I love to hear how you like these ideas. Which one do you like best?
Thanks for stopping by!
Artwork: Stampin' Up!©
I got to the Beautiful Blizzard bundle I got some ideas that I just had to try out with the Blizzard Thinlet! Let me show you!
|
|
|
Looking at these two cards you can see that I used the positive and negative images.
Card 1: On a 4 x 5 piece of card stock, which is the size of the Thinlet, I adhered a piece of our Adhesive Sheet to the whole piece of Shimmer cardstock. Then I ran it through the Big Shot. I ran it through a couple time. It was early so my brain was still in a bit of a fog. It wouldn't cut through the backing of the Adhesive sheet. Then the light bulb came on! Duh! the adhesive was on the snowflakes, I didn't need to punch them out. So I peeled them off and place them on the Balmy Blue cardstock in about the same place that they are on the die. That card is on the left. I even used the little tiny dots that were left behind. (Note to self, buy that new "Take Your Pick Tool", pg 30 in the Holiday Catalog!)
Card 2: I peeled off the Adhesive backing off the remaining negative
sheet of Shimmer cardstock and placed in another piece of Balmy Blue. Some of the snowflakes don't have centers so I placed rhinestones in the center of each snowflake. Great way to get two cards out of one piece of cardstock. I love saving paper, don't you!
Card 4: On a piece of Night of Navy, I used the Blizzard die and some of our White Shimmer Embossing Paste. Smooth the embossing paste across the back with a pallet knife. Gently lift the die off of the paper after applying the embossing paste and let it sit for 5-10 minutes to dry.
- Notes:
- 1. Make sure you put the cutting side down when applying the embossing paste.
- 2. Make sure that the glue/tape residue is removed from the Thinlet, the sticky stuff that remains when you pull the die off the cardstock that it's attached to when you receive it. I didn't and it ruined my first piece of cardstock.
- Clean your die immediately after applying the embossing paste. I just ran it underneath a little warm water and then dried it off with soft towel.
And to think I bought this set because of all the beautiful snowflakes and it would cut bunches all at once!
I can't show you an image from the catalog until September 5, but I did take my own photos so I could upload it into my Evernote. These photos don't really do justice to the set.
I love to hear how you like these ideas. Which one do you like best?
Thanks for stopping by!
Artwork: Stampin' Up!©


Comments
Post a Comment